
I’m still working away on pouring all of the concrete faux stones for the skirting area of the front porch. When I left you on Friday, my plan was to get all of my molds that I had made for the faux stones set up in the carport, start mixing concrete, and basically have an assembly line going all day Saturday so that I could get as many stones created as possible. But then I realized I had skipped a crucial step. I had no idea exactly how many of each stone I needed to complete the skirting. And to figure that out, I had to map out the design before I started pouring concrete.
My initial thought was that I could use ChatGPT to create this design map of my stones. I had eight different molds, and all eight were different sizes, and I thought for sure that ChatGPT could do this much faster and better than I could. I mean, AI is much smarter than I am. So I went to ChatGPT and gave it this prompt:
I’m working on a front porch project. The skirting area (i.e., the front and side vertical portion) is solid concrete, and I want to adhere a faux stone to the skirting area.
The area that needs to be covered measures 13.5 inches high. The front of the porch that needs to be covered is 154.5 inches wide, and then on the far right side, there is a 90-degree outside corner, and the side skirting area of the porch is another 60 inches wide.
I have faux stones in eight different sizes that I’ll be using to cover this area. The stones are the following measurements:
- 5″ high x 24″ wide
- 2″ high x 16″ wide
- 5″ high x 15″ wide
- 7.5″ high x 15″ wide
- 5″ high x 20.5″ wide
- 2.5″ high x 7.75″ wide
- 7.5″ high x 15.5″ wide
- 5″ high x 16″ wide
Between the stones, I want to leave 1/2 inch for mortar lines. However, I do not need mortar lines below the very bottom row of stones or on top of the very top row of stones. I also don’t need mortar lines on the far left side of the arrangement on the front of the porch skirting (i.e., where the stones meet the front porch steps). On the outside 90-degree corner, I want my 3/4″-thick stone facade to look like complete stones, so I want consistency from the far right on the front of the skirting to the far left on the skirting area on the side of the porch.
I don’t mind cutting the stones, but I’d like the overwhelming majority of the stones to be used whole.
Based on all of that information, please create two diagrams — one for the skirting area on the front of the porch and one for the skirting area on the side of the porch — arranging the stones in the available sizes to create the most random arrangement without an obvious repeat in the arrangement.
I’ll be pouring these faux concrete stones myself using molds that I built, so on the diagram, I’ll need you to use the numbers associated with each size that I listed above to show me where each stone needs to be placed, and so that I can know how many of each stone size to make.
I was pretty excited to see what it would come up with, and I was also confident that it could come up with a much better design than I could. It took quite a while for it to generate the images, so I walked away from my computer for a while, and then came back later, anxious to see the amazing design that it had created for me.
Imagine my disappointment when I saw this…
Yeah. That’s terrible. There’s nothing “random” about the placement of those stones. I could have done that in the same amount of time it took ChatGPT to do it. But that’s the exact kind of design I wanted to avoid.
And, unsurprisingly, it just continued that same design around the side of the porch.
There was no way I was going to arrange the stones in that pattern when the real stones on the rest of the house are arranged in a truly random pattern. Well, obviously, they’re not random. There was a lot of thought and planning that went into this. But the arrangement isn’t predictable or in a an obviously discernable and repeating pattern…
So with ChatGPT completely failing me, I had to come up with my own design. I used my photo editing software to create an image of each stone with its proper measurements, and then I copied and pasted each of those images onto a larger image that I had created to represent the exact dimensions of the front porch skirting area.
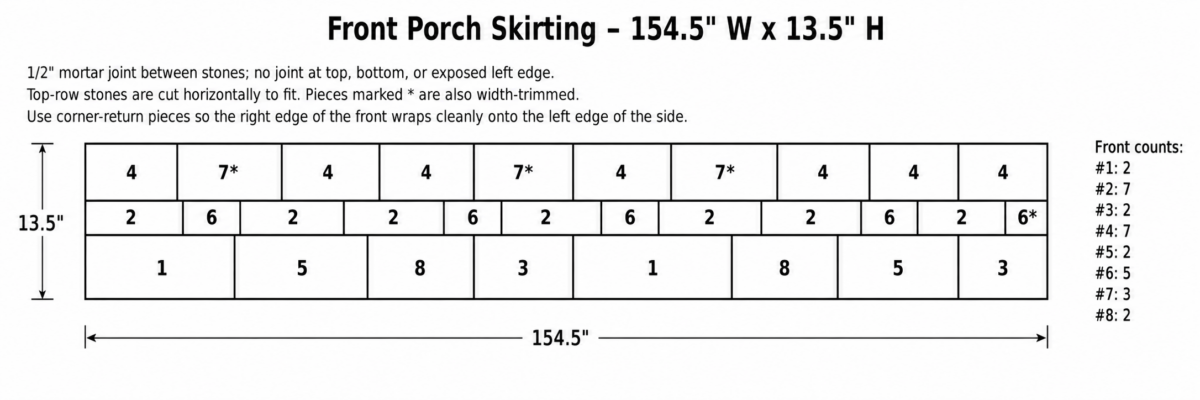
As I had explained in my prompt for ChatGPT, I wanted to use as many whole stones as possible, but I was okay with cutting a few of them to fit. This is the arrangement I came up with. The stones with the little white asterisks on them are the ones that will need to be cut to fit.

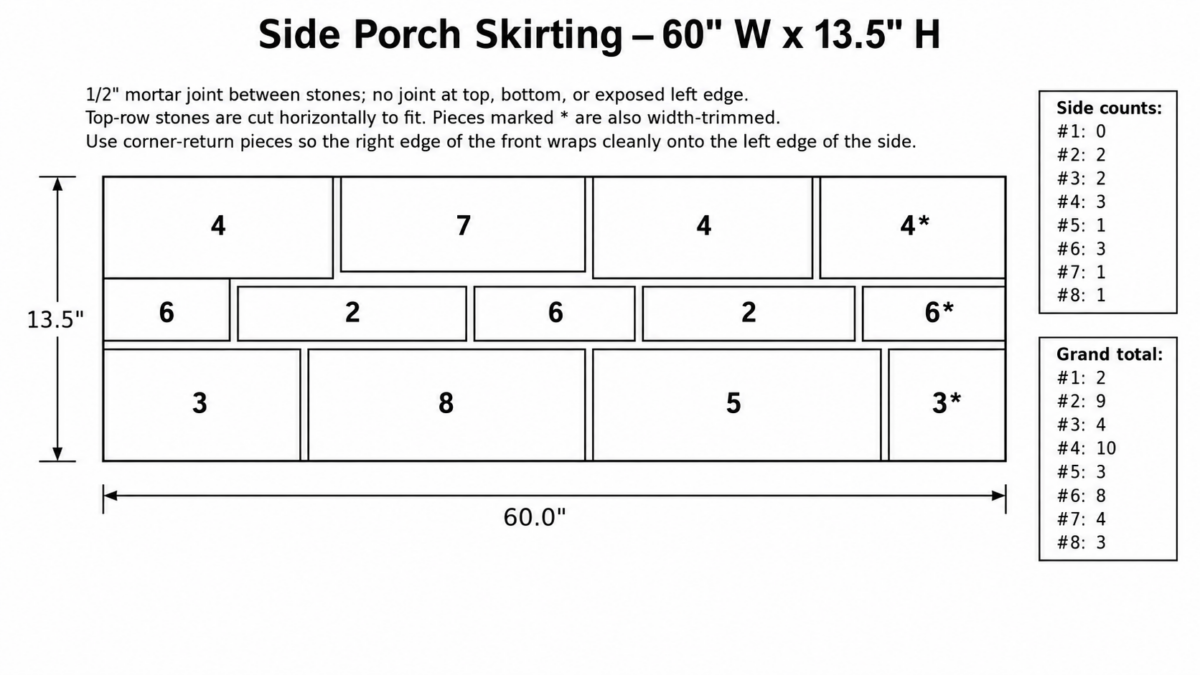
And then this is the design I made for the side of the porch.

So the plan is to end the right corner of the porch with two stones (the green and light orange stone) that will be cut at a 90-degree angle, and then those will wrap around to the side of the porch to create the look of full stones, and then continue on with the rest of the design.
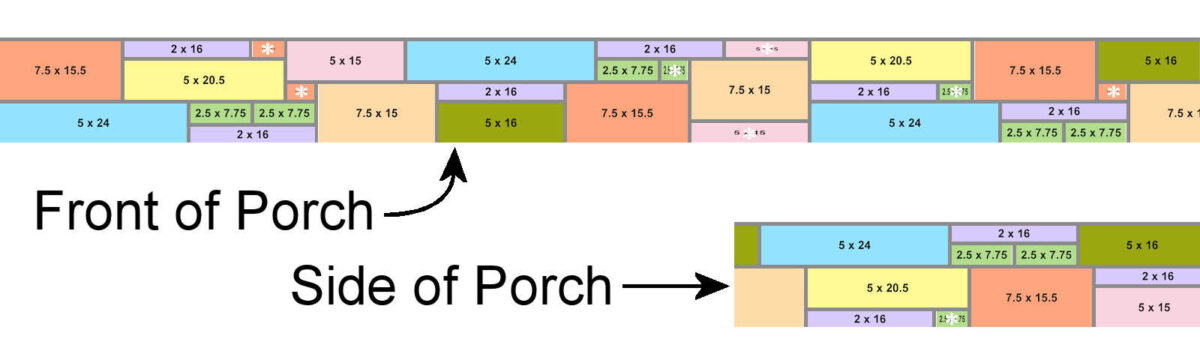
And to test out the design and make sure I got the proportions right, I copied and pasted the map onto an actual picture of the front porch skirting area. It looks like I got it right!
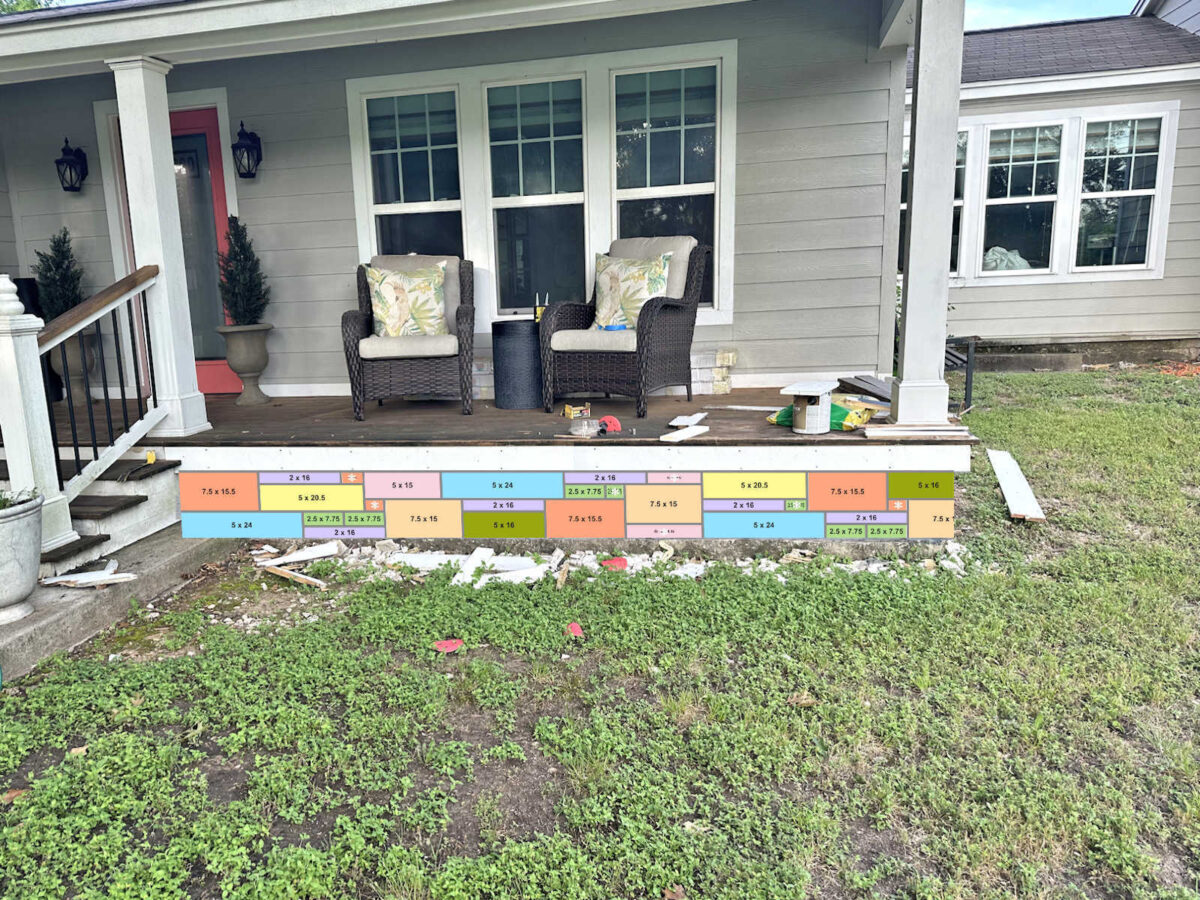
I’m not going to lie. This was a very time-consuming process. I not only had to account for the sizes of the stones, but for the 1/2-inch mortar lines to make sure that I covered every square inch of the skirting area. But with those two maps in hand (I still need to do one for the small area to the left of the front porch steps), I knew exactly how many of each stone I needed. I was kind of shocked to see just how few of the larger stones I need. Had I just set up my assembly line and started pouring concrete, I would have wound up with way too many of the big stones, far too few of the small stones, and I would have wasted a whole lot of concrete and time.
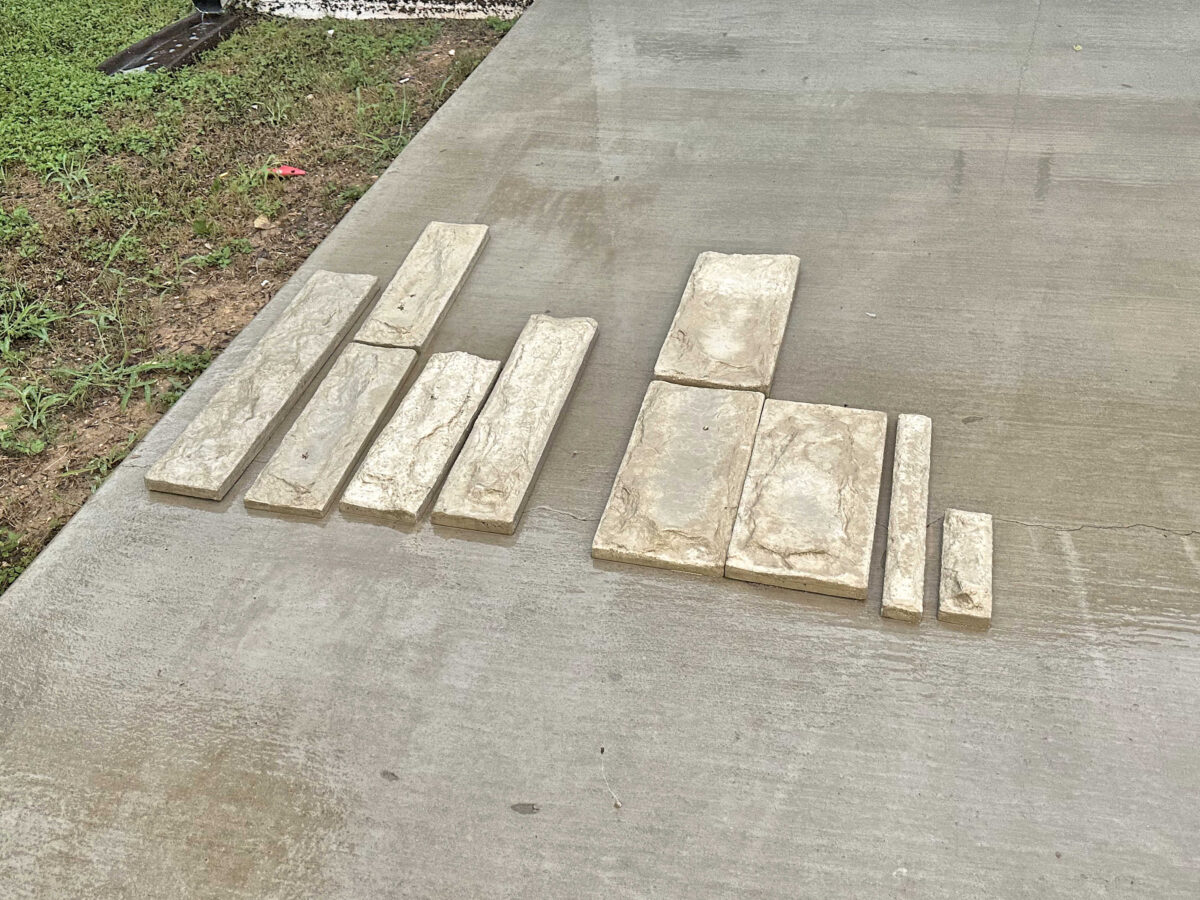
The actual concrete pouring process went really smoothly. I set all of the molds up on a folding table in the carport and made sure they were all level. And then I mixed the concrete in small batches — just two quarts of concrete and 1/2 quart of water at a time — and worked as fast as I could mixing batch after batch until all of the molds were filled. And then I babysat the molds for a while, spraying them down with water as the concrete started getting really hot to keep them from cracking as they cured.
The demolding process was the most time-consuming part of the whole process. Because these stones are so textured, I had to remove one side of each mold to pry each stone out. Then I had to reassemble the mold, readjust the sand under the textured silicone mat, and re-caulk the mold to get it ready for the next pour.
I actually didn’t get very far on the concrete pouring. I got my first batch done, got the molds ready for the next pour, and then Matt needed my help with something that took quite a bit of time. By the time I was ready to head outside to do the next pour, it was pouring down rain. I mean, it was pouring so hard that everything under the carport was getting wet, including my bags of concrete. So rather than pouring more concrete, I had to spend all of the time I had left moving concrete and tools to protect them from the rain. And of course, the area where I had my table set up with the molds was getting pummeled with rain as well, as were my concrete stones that I had placed on the ramp to the workshop.
So once again, I got derailed by rain. It’s the middle of June. In central Texas. The rain should be gone by now, and we should be having high 90-degree weather with nothing but sunshine. This rainy weather is really starting to frustrate me. I haven’t even looked at the forecast for this week, but I’m really hoping that my week (which is supposed to be my last week of working on outdoor projects) doesn’t get rained out!! I’ll be so disappointed if that happens. But there’s not a whole lot I can do about it, is there? I might have to be flexible this week and come back to this project at a later date.
More About Our House Exterior & Yard

see all exterior &
yard diy projects

read all exterior &
yard blog posts

Addicted 2 Decorating is where I share my DIY and decorating journey as I remodel and decorate the 1948 fixer upper that my husband, Matt, and I bought in 2013. Matt has M.S. and is unable to do physical work, so I do the majority of the work on the house by myself. You can learn more about me here.
Trending Products
